Friday 10 May 2024

New Figures

Risk of overstaffing at Nystrup Gravel? It could be the case with the latest delivery from the busy 3D printing maternity clinic in Bristol, also known as Modelu. 6 new employees were included in the package. The figures were accompanied by two foxes to add a little life to the area behind the loading ramp. 

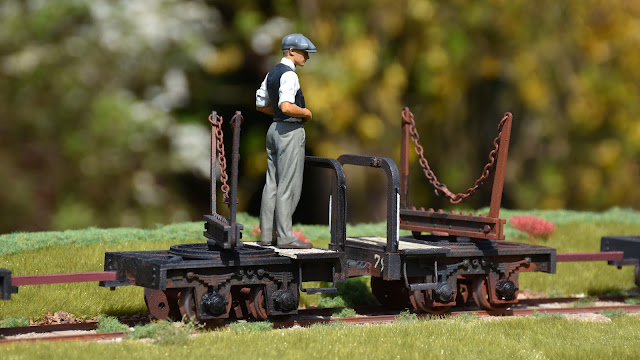
One of the new figures resting againgst the footplate of the Fowler (with added detail parts yet unpainted). Small remnants of the 3D printings supports can still be seen here and there on the figure.

As with earlier purchases from Modelu I've not planned getting all figures ready for service at once. The most pressing need is to get a driver figure for the Fowler locomotive. The idea is to select one or two figures from the two crew packs to be converted to a Fowler driver. I'll probably have to do minor surgery and a little sculpting as I did a lot when I modelled in 1:35 scale.

Modelu crew pack 11208 for the small England engine. Photo: Modelu

Modelu crew pack 11219 for quarry Hunslet engine. Photo: Modelu.

After a switft production time of one week and a one week postal and customs trip to Denmark I couldn't wait to open the package. Safely wrapped in several layers of bubble wrap inside a solid cardboard box the figures waited for me to examine them and test fit them in the Fowler cab. I had a surprise waiting for me. My earlier deliveries from Modelu has been of figures with the 3D printing supports removed. Now the figures are supplied with the complete support structure of a web of thin posts. They help the figure to remain firmly supported during printing and initial curing. The removal of the support posts isn't a difficults task. Only a sharp knife, a side cutter and some time is needed. What surprised me the most is the new level of detail. My 1/19 scale figures from Modelu has been adequate in detail, but I have often been disappointed by weak facial detail, soft and missing detail in clothing and bad demarcation from eg. trousers to shoes. Most of those objections are now gone. I'll be going into detail when I start working on one of the new figures. And by the way: the price has gone down as well!

The right figure from pack 11219 resting his back side on the low rear wall in the Fowler cab. To call him a perfect fit isn't quite true, but it's a close call.

Here the figure is seen from the side.

The left figure from pack 11208 was my second bet on a possible driver figure fro the Fowler. He looks good too, but needs something the rest his right arm on. 

Peeking out from the cab. 

I'm quite confident that I now have a decent driver for the Fowler. Adding a little material to the backside of the figure from pack 11219 and adjusting the height (trimming shoes and cap) will obtain a near perfect fit in the cab. And the figure will even be removable and at the same being able to keep its position while traversing bad track (as all track is at Nystrup Gravel).

As for the rest of the figures pictures will have to wait. It's Spring and I'm too busy with the 1:1 scale vintage railway, maintenance of two wooden houses and real work. But one of the Modelu foxes sneaked out and was photographed near the lorry loading ramp.

A Modelu fox in 3D print has crossed the meadow covered by static grass from the photographic rendition of a wood where it usually lives. 


Thursday 2 May 2024

Timber Bogies From the Archive

The archives from Nystrup Gravel have been mostly preserved by a local historical archive and are kept accessible to the public. Last winter I found a nice photograph from the early 1950's showing the Lister loco with two timber bolster bogies loaded with a large log.

Loco no. 3 picking up a pair of loaded bogies for transport to the yard where a lorry will bring the log to the railway station in Skovby for transport to Sundborg.

Of particular interest is the writing on the log end faintly visible in the photograph. The letters 'SU' marks the log as one destined to go to the Sundborg Sawmill. The sawmill in Sundborg is currently being recreated in 1/87 scale by a Danish modeller and the plans and progress can be followed on the Sundborg Blog. The blog is in Danish only, but the pictures will tell most of the story.

Tuesday 30 April 2024

Timber Bolster Bogies Finished

Picking up where I left after having painted one timber bolster bogie from Rail Print with rust coloured paint, I continued detailing the remaining 3 bogies and giving them the same treatment with paint from a spray can with rust coloured paint with a slight texture. Now the proces has been finalized and all 4 bogies are painted and weathered.

Lister No 3 with finished bogies 79 and 72 loaded with a single log. 

For me painting is both a blessing and a curse. A curse because it involves a radical departure from the build phase and involves some substantial risks. Paint is put on in large volumes often covering the complete model. If something goes wrong the paint is often only removable with a lot of work and damage to details is often difficult to avoid. On the other hand painting is a blessing as it is a welcome shift to a more artistic part of modelling. I also love how the model evolves from a maze of different colours and materials to a uniform object beginning to look like the prototype. 

Part of Nystrup Gravel's small fleet of timber bolster bogies still unpainted showing the different colours of the printed parts. The most obvious added parts are the footsteps and manufacturer's plates. Hand rails and tiny bolt heads aren't showing as clearly.

Once the three remaining bogies had the last detail glued on I gave them a layer of rust colour straight from the rattle can from Belton. A standard 400 ml spray can managed to cover 4 timber bolster bogies - a testament to how large 1/19 scale vehicles are. I then added a random number of spots in varying rust tones around the bogies. The bogies were then airbrushed with Vallejo chipping fluid before I added the covering colour. The chipping fluid didn't airbrush well and went on in layers of varying quality. If I did something wrong in thinning it or if the fluid had gone too old I don't know. Before I began painting all wheel treads were protected with Tamyia masking tape cut in appropriate width.

Four bogies painted with 'Rosteffekt' from Belton posed for a snapshot on the layout before further painting.

I then added a mix of black and different dark grey colours to the bogies. I tried to avoid covering everything with black or grey pain, leaving some random rust coloured spots to show. That is first stage in representing bogies with flaked and worn paint. Second stage in that proces is wetting the covering paint with tap water and rubbing selected areas with a combination of toothpicks and a stiff brush. This makes the cover paint loose grip on the chipping medium below, causing it to chip away. Quite a clever way of producing rusted vehicles. I have tried the method before on some of my steel skips. I think the results are better thus time due to the textured paint.

First couple of timber bogies (74 (closest) and 76) with dark grey paint and a thin twig from the garden. 1/19 scale takes serious twigs to produce a credible looking load! 

Close up of chipped paint made with Vallejo chipping fluid. The textured rust paint is clearly recognisable. 

Hand painting numbers. Best done completely relaxed and with the family out of the house. I did my numbers in 10 minutes between two appointments.

With the cover layer of dark greys and black applied I continued using brush painting for adding spots of different tones of greys and continued chipping to show more of the rust colours under the cover paint. I also handpainted numbers on the bogies' outer ends on the right side of the buffers with white paint and painted the wooden platforms on the brake bogies with a mix of acrylic colours. When the final chipping had been done, I added a layer of matt varnish to seal the result and applied some weathering with a wash of heavily diluted black oil paint and some rust streaking with burnt sienna oil paint. Worn metal on hand rails, footsteps, buffers and bolsters were done with a soft pencil and graphite powder. Graphite powder was also used to grease the bolster unit and the mating surfaces on the bogie to achieve a minimum of resistance in operation. 

All four timber bolster bogies finished and photographed in the garden. From left to right bogie 76, 74, 79 and 72. All built and painted with little differences to set them apart from each other.

Braked bogies are usually positioned next to each other to allow the brake man to operate brakes on two bogies. Nystrup Gravel removed the brake system on their bogies, but the habit obviously lived on.

For those wondering how the Vallejo chipping fluid worked I'm glad to report that the initial troubles had no influence on the chipping. In combination with the textured spray paint I think the chipping has produced some nice surface detail. 

Close up of bogie 79 with a heavily rusted top. The textured paint show up well in most placec and the combined effect of chipping fluid and spot painting shows as well. Unfortunately some printing lines are also visible. I guess it's just me doing 3D print modelling - I never fail to loose patience when sanding.

One last shot of loco 3 with a set of new bogies on its way from the gravel pits to Nystrup.

I label the bogies finished, but they still need coupling chains, new coupling rods to replace the 3D printed ones and a few logs for a load.  

Sunday 14 April 2024

Boxing People for Safekeeping

The small population of my Nystrup Gravel layout have been kept in storage on the layout and on shelves. That is not a sound long term solution. The figures represent no small investment in modelling time and money so they should be treated with no less respect than locos, rolling stock and cars.

Photographing in the Nystrup Gravel yard. My figures have to have some time off from the layout. But where to put them? I have now solved the problem.

Wanting to fix the problem fast, I didn't bother looking for a fancy wooden box, but found a cardboard box with generous size for my current and well into the future needs for storing 1/19 scale figures. I may upgrade to a wooden box if I stumble over a good sized box. For now the figures are much safer in the cardboard box than before. When I modelled in 1/35 scale I went to great lengths making tailor made wooden boxes for locos and wagons. I haven't quite reached the same level in 1/19 scale.

Cardboard box measuring 26 x 24 cm and 7 cm in height.

Bubble wrap lining inside the box with my figures added. Nystrup Gravel's population is all male.

Soft foam scrap pieces keeps the figures tightly in place when the lid is closed.

'People' written on the lid in stencilled cyrillic letters - just because I can.

The brown paper wrapper for my plastic cyrillic stencils bought in Leningrad, USSR, 1987. 

With about 30 minutes of design and work I now have a simple safe storage box for my figures. No more worries about scratched paint, broken off limbs or other damages. Safely tucked away in the box until picked out when their services are needed.

Friday 5 April 2024

Detailing Timber Bolsters

Last month I received 4 bogie timber bolsters in 3D print ready to roll. As usual with 3D printed models I feel I have to remove the most visible traces of the printing proces - the thin lines of layered resin or plastic material. A lot of work with sanding sticks and sand paper will usually take care of most of it. I also wanted to add a little extra detail. I'm still working on the bogies and below is a status of the progress.

One rusty timber bolster bogie, a horse without harness and a bewildered workshop manager drinking coffee. Weekend approaching at Nystrup Gravel?

As I took a closer look on the timber bolsters I decided to limit my work on them to the following tasks:

  • remove most of the 3D printing layering lines by sanding (the paint I use help to hide the rest)
  • fill holes in the bogies' top plates (don't know why they are there?)
  • replace printed on footsteps with scratchbuilt metal items
  • add bolt detail
  • remove brake gear
  • add hand rails

Filling holes with putty and sanding (particularly the upper surfaces) was done on all 4 bogies in assembly line-style. After testbuilding the first footstep and fitting it on one side of a single bogie, I built and fitted the remaining three steps. I intentionally made two of the steps crooked as the steps were prone to be damaged by occasional derailments. From there I concentrated my efforts on a single braked bogie. The rest will hopefully follow in quick succession.

New footstep made from nickle silver sheet and brass wire next to the item to be replaced. The 3D printed part was too clumsy in my opinion and easy to replace.

'Pretty decent work', the Nystrup Gravel chief mechanic seem to think, 'Now three more steps needs replacing'.

From the beginning I had been a little disappointed with the look of the brake installation printed integral to the platform railing. As Nystrup Gravel's lines were without steep gradients braking, besides what could be accomplished by the locomotives, weren't necesarry during a train's movement. To keep wagons stationary on sidings a branch or a stone placed on the railhead would usually suffice. Only a few braked skips are documented on photos from Nystrup and consequently I decided to discard the brake installation. I presume it was removed on the real version of Nystrup Gravel to cut down on maintenance and to avoid complicating the operational environment for the workers who seldom were among the most mechanically experienced. 

Having cut away the brake installation from the platform railing I added handrails and corresponding bolt imitations. The railing was then glued to the bogie with AC-glue. More bolt heads from sliced octagonal plastic strip were added to bogie ends and under the axle box guides. Total sum of new parts added to the bogie reached 36. In addition I glued two pieces of lead under the bogie to increase its weight. 

The first 1/19 scale timber bolster bogie in rusty condition. Hardly anyone will notice my work adding bolt heads, handrails and replacing footsteps. But I know it's been done.

The bolster works as the real thing: lift the side support and it falls down to allow loading or unloading.

I separated bogie and timber bolster before painting to avoid everything being 'welded' solidly together by dried paint. I used a rust colour in a rattle can. The paint has a slight texture to it. I used a German made product 'Rosteffekt' from the brand Belton in a standard 400 ml spray can. The paint does smell quite a bit and it's probably best to use it outside the house - I did.  

The bogie will have a partly covering layer of dark grey paint over a covering of chipping fluid from Vallejo. That will allow me to create an impression of flaking and worn paint with rust showing through. But first I will finish the other three bogies.

Friday 29 March 2024

Steel Sleepered Track Panels

With the package containing the 'Planet' motorised skip I also received an assortment of track panels with steel sleepers. I have aquired the track parts to be able to quickly get a train running when I'm away from home. A few straight lengths of heavy Peco SM32 flextrack isn't exactly light or handy - nor does it allow for easy continous running.

Two straight track segments from Loco Remote. 

The track panels are designed by Loco Remote on basis of the lightweight track system made by British company Robert Hudson from Leeds. The track system known as 'Jubilee' consisted of light rail profile attached to pressed steel sleepers to make up a track panel that could easily be carried and connected to other panels. Curved panels in several radii were offered by Hudson and with points also in the catalogue you could basically order a complete narrow gauge railway from a single supplier. The concept, pioneered by French producer Decauville, were offered by a range of German producers as well. Now Loco Remote allows me to order a similar designed rail system in 1/19 scale. If I had a 3D printer myself I could even have downloaded the printing files free of charge and printed out my own track system.

In my old scale of 1/35 I previously worked with steel sleepered track panels. I used two different designs made in resin and 3D printing with Code 100 and 83 track

Close up of a straight track panel. Small imitations of bolts or rivet heads are visible. Both types of fastenings could be found on prototype panels.

A sharp radius turnout. The tongue assembly isn't exactly true to prototype, but it works and once painted it will be far less noticable.

With close inspection (and a bit a luck) a dedicated expert can probably identify the maker of a full scale track panel, but in model form I don't think the very small differences are worth much attention. It was without any worries that I ordered 10 straight and 10 curved panels as well as 2 points. In the set were also two buffer stops, but they were so ugly that I binned them immidiately.

The Loco Remoto track panels have a sleeper profile corresponding to the original Jubilee track. Some 'lining' traces from the printing proces can be seen on the sleeper surface. Small imitations of bolts or rivet heads are visible. Both types of fastenings could be found on prototype panels, but I'm unaware if Jubilee track was bolted or riveted. The rail profile on the 3D printed track isn't qiute matching a vignoles profile, but very few will notice that. The track handles all my rolling stock and locos, even those with high (and unprototypically) flanges. The track panel 'couples' by the means of a Lego inspired stud system that connects one half sleeper to another half sleeper on the neighbouring track panel - a simple and clever solution.

Painted and unpainted track panels connected. The lines from the printing proces are visible on the top of the sleepers. The studs connecting the two track segments are clearly visible.

The track system works fine on a level tabletop, floor or as built into a layout, but I doubt it will work on an uneven surface due to its light construction and method of connecting the individual panels. For running trains in the garden the track system isn't a good choise. But then again: I ordered the track to be able to play trains on a table to show some simple modelling in a large scale on narrow gauge. For that purpose the track is close to perfect!

600 mm track panels on steel sleepers from the German Army 'Brigade' railways used to supply frontline units with ammunition, food and building materials during WWI. Here seen at Besucherbergwerk 'Volle Rose', Ilmenau, 2019.

Random stack of track panels at the heritage line Hedelands Veteranbane in Denmark showing US/French army track (rounded sleeper ends) German Brigade track and lightweight track with sleepers looking like 'Jubilee'/Loco Remote track. Never walk past a stack of track panels without taking a closer look!

Wednesday 13 March 2024

Nystrup's Timber Bogie Bolsters

Several of Nystrup Gravel's pits were located in wooded areas and before removing the overburden over the gravel deposits, trees had to be cleared away. For transporting felled trees from the pits Nystrup Gravel used a pair of bogie bolster units. I have now aquired 4 bogies and will in no time have them up and running on the layout.

Four timber bogies fresh from the producer in the UK. Chief mechanic Petersen inspecting the new equipment.

The bogie bolsters are from the British producer Rail Print and 3D printed in resin in differing colours. The print quality is from fine to moderately fine. On some spots the prints will benefit from sanding. As usual for 3D printed models in the scale an assortment of bolts and rivets are missing, particularly on the buffer planks. I note that brake shoes and rods are also missing on the braked bogie. As they are not particularly visible I haven't yet decided if I will fit them myself.

Braked bogie with plank deck for the brake man. Railing and brake handle is supplied in the kit ready to fit in the corner brackets.

My timber bogies as delivered. While they basically only need a single part fitted and paint to finish, I will be working a bit more on them adding details.

A pair of bogies seen from above.

On the real Nystrup Gravel felled tree trunks were pulled to the 600 mm narrow gauge line with horses and after WWII with a huge Soviet made crawler tractor. The timber was then loaded on a pair of bogie bolster units and taken to Nystrup by rail where they were sold to a local timber merchant selling them on to a saw mill in the other end of the country in the town of Sundborg. Must have been some rather good timber to warrant such long transport!

Bogie bolsters were seldom seen on Danish industrial narrow gauge railways and Nystrup's 4 bogies are thus quite unique. Most likely they were brought to Denmark by the German authorities during the occupation of Denmark 1940-1945 for work at the airfield at Mellemåen (Middle Stream) not far from Nystrup. A selection of locos, track and wagons was aquired from the airfield by Nystrup Gravel after the war. Read more about the airfield and Nystrup Gravel's relationship here.

German timber bolster bogies at the 600 mm gauge Waldeisenbahn Muskau. 2012.

Two unbraked bogies coupled. Notice the dangerously narrow spacing between the bogies leaving very little room for the worker doing the coupling. Photographed at Waldeisenbahn Muskau in 2003

The Rail Print bogies are a good and reasonably priced way of getting some charateristic timber bolsters on my little 1/19 scale layout. For me the task of removing some of the traces from the printing proces and adding a little extra detail doesn't detract from their quality. I like to work on any model regardless of quality to make it my own personal interpretation of the prototype. For the modeller needing a a pair of bolsters in 32 mm gauge with no need for extra detail, all that has to be done is fix the railing and apply a coat of paint. Ready to roll! And speaking of rolling, the 3D printed wheels worked fine on my short test run. I expect them to perform quite well in traffic. Time will tell.  

The 3D printed part for the brake platform. Detail isn't super sharp, but nothing that I can't fix.

Image of 4 bogies printed (or painted?) in black with loads. With a load of tree trunks they are looking really good. 

With loads of new stuff having now arrived I better get the worktable geared up for some modelling!